In this tutorial we are going to create create steel text effect. This is very simple and quite effective tutorial, so all you need is Adobe Photoshop to create this effect. So, have a look at this steel text effect tutorial and let us know your thoughts in comment.
[ad#co-2]
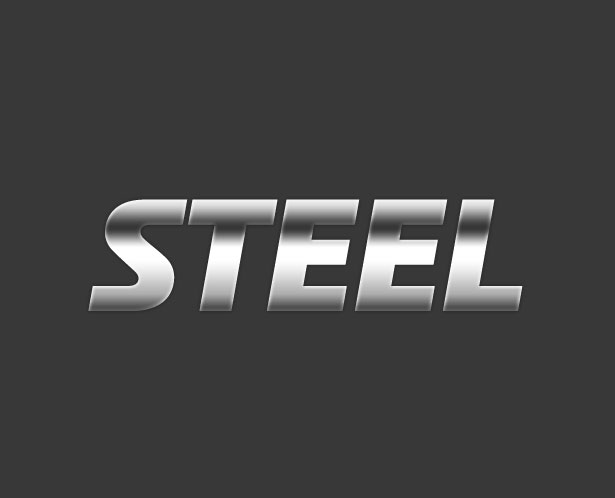
Final Preview
Step #1
Open photoshop and create a new document, mine is 615px×498px with a white background.
Step #2
Fill the color in background layer, mine color is #333333.
Step #3
Select Horizontal Type Tool and Type Text on front.
Now apply some effect
Gradient Overlay
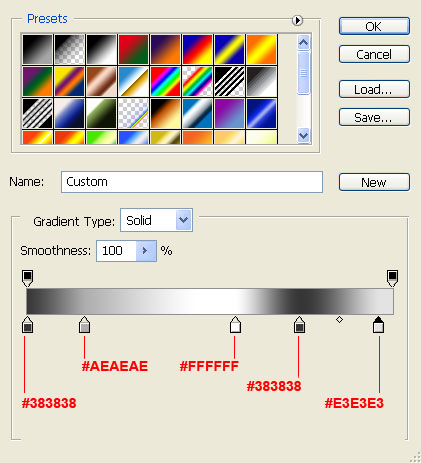
Styling the text double-click on the text layer’s thumbnail in the layers panel to open up the layer styles dialog box, we will apply a vertical gradient effect for your text. Then click on the color gradient on the right of the gradient option to open up the color gradient Editor.
To give the text its silver color, use a Gradient Overlay with different shades of gray, white, and black.
Inner Shadow
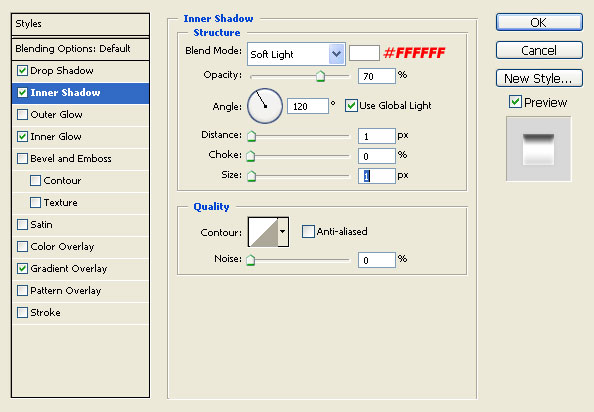
Next apply the Inner Shadow layer style. Most Important Part keep the Angle at 120o, than changing the values of Opacity, Distance and Size. I choose to set the Opacity at 70% and Distance at 1px and Size at 1px.
Change to blending mode normal to softlight and change to color of shadow to #FFFFFF.
Inner Glow
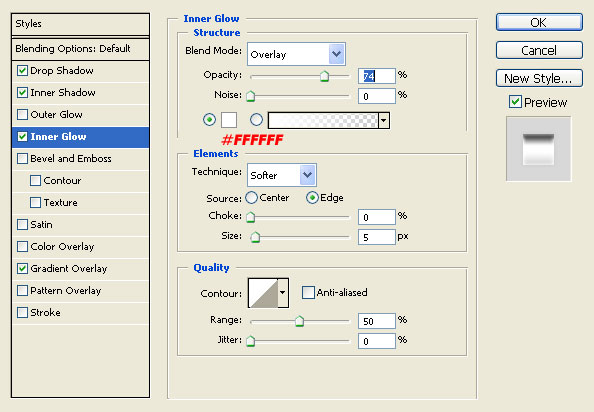
Next apply the Inner Glow layer style. Changing the values of Opacity, Choke and Size. I choose to set the Opacity at 74%, Choke at 0% and Size at 5px.
Change the blending mode normal to overlay and changing color from the default to #FFFFFF
Drop Shadow
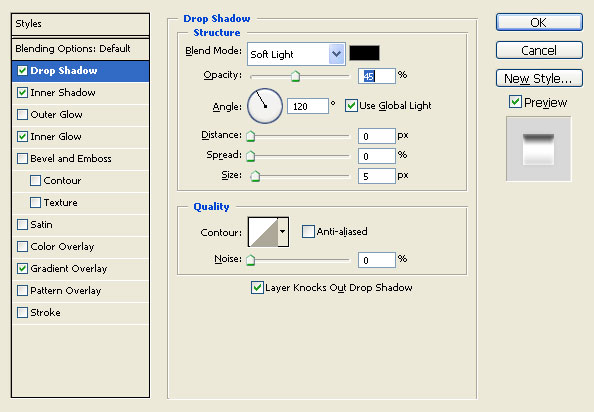
now we will apply the Drop Shadow layer style. Keep the Angle at 120o, than changing the values of Opacity, Distance and Size. I choose to set the Opacity at 45%, Distance at 0px and Size at 1px.
Changing the blending option default to softlight
Text should look like this
Step #4
The button layer’s area (Ctrl + Click on the Button Layer’s thumbnail in the Layers Panel).
Than create a new layer name the layer text_pattern.
Now we will fill pattern on text_pattern layer. I’m using this pattern.
Than Changing the blending option to overlay and I choose to set the opacity at 40%.
Final
If you’d like to check your work, you may download the PSD file for this tutorial






Nice tut
Not a bad looking effect. The texture you added in the last effect really makes it stand out. I don’t really get a “steel” feeling from it though: It almost looks like something you would see on a racetrack banner. Nonetheless, it looks sharp, good tutorial.
.-= Joseph McCullough´s last blog ..Blogging: Escaping the Mediocrity =-.
Pingback: CSS Brigit | How to Create Steel Text Effect in Photoshop
Pingback: 145+ Useful Fresh Articles for Designers and Developers | tripwire magazine