In this tutorial we are going to create Vintage Photo Effect. This is very simple and quite effective tutorial, so all you need is Adobe Photoshop to create this effect. I hope you will enjoy this tutorial.
[ad#co-1]

Let us know how that this tutorial can be more better? If you found any other photoshop tutorial that you want to share with us,feel free to let us know by dropping in a comment.

Step #1
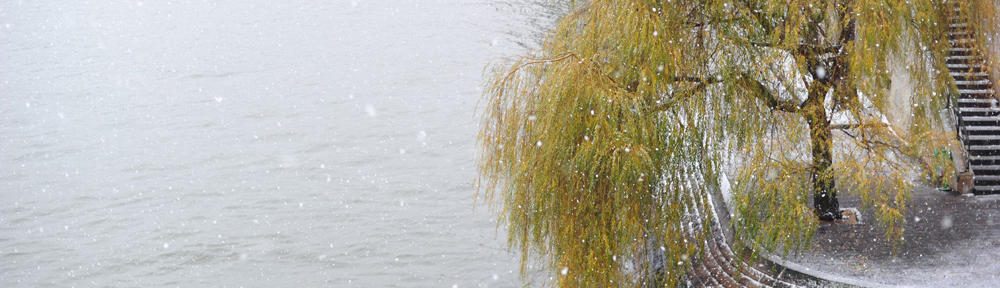
Open the image in Photoshop. For example I’m using this image. Here you can download from Here

Step # 2
First we will apply color balance. go to Image > Adjustments > Color Balance (CTRL+B) and apply these values

Your Image Should Look Like This

Step # 3
Now Create a new layer (CTRL + SHIFT + N) and fill the colour #DCE354

Next change the Blending mode at Multiply and set the Opacity at 75%
Your Image Should Look Like This

Step #4
Now Create a new layer (CTRL + SHIFT + N) and fill the colour #111842

Next change the Blending mode at Lighten, set the Opacity at 40% and fill at 55%
Your Image Should Look Like This

Step #5
Next we will add some texture.Open the Textures in Photoshop. For example I’m using this Texture. Here you can download from Here

Here is the way i do it.

Next change the Blending mode at Overlay, set the Opacity at 65%.

Step #5
Final Step now back to the image layer we will apply some filter. Go to Filter > Render > Lighting Effects
Here is the way i do it.

Final Result
if you would like to receive more Tutorials from us, please consider subscribing to our feed by RSS or by email.
Wow these all pics are really awesome!I love all this images.I love to do image editing in photoshop and I have done this one also.Its so nice.I will share this information with my friends also.Thanks.
jeux wii
i did this tutorial and are you copying it ?
http://designora.com/tutorials/photoshop-vintage-effect/
This is not your tutorial, and for your kind information my tutorial is much different than your tutorial.
Hey this is a great tutorial! Thanks much for posting this — I’m going to pass this to some of my design friends.
very nicely done.thanks for sharing.
great easy and simple tutorial! Cant wait to try this on a few photos when I get home. Thanks for sharing.
.-= BeyondRandom´s last blog ..NFL Network Has Great Ad Placement Skills =-.
Thanks, this is really great and easy to follow, but do I have to go through every step with all the pictures I would like to use this on? Or can I somehow save the layers?
Thank you 🙂
how do you fill a layer with colour? at step 3
what do you click?
sorry, I’m a noob..
Wonderful tutorial. Thanks for shear this good post.
Thanks , all those photoshop tutorials picture are very fantastic .working on a project and you have just saved me some time creating effects owns of my project.
Actually have a very nice blog, I wish I could see everything you have all the time and best wishes for your blog.
Hi! As Amanda asked earlier.. how the heck do i change the color of the layer? Im using cs5 and i just cant seem to find the right button to click. *going insane* argh
Pingback: Ultimate Collection Of Retro and Vintage Photoshop Tutorials
Pingback: High Quality Vintage Photography Photoshop Tutorials