In this tutorial we are going to create simple folder icon. This is very simple and quite effective tutorial, so all you need is Adobe Photoshop to create this effect. I hope you will enjoy this tutorial.
Final Result
This is what we gone do today
Step #1
Open photoshop and create a new document, mine is 550px×550px with a white background.
Step #2
Select the Pen Tool make sure you’ve got those options selected.
Now using the Pen Tool draw something like this
Now we will apply somesome layer styles
Gradient Effect
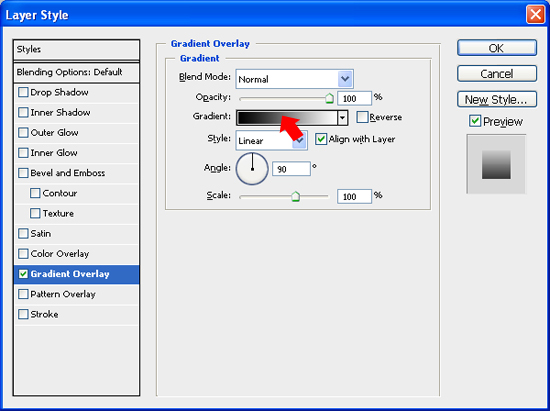
Styling the Button double-click on the Shape thumbnail in the Layers Panel to open up the Layer Styles dialog box, we will apply a Vertical Gradient Effect for your Shape. Then click on the Color Gradient on the right of the Gradient option to open up the Color Gradient Editor.
Double-click on left-color-stop and enter the color value #FFD772, then double-click on right-color-stop and enter the color value #FFFF99.
Inner Glow
Next apply the Inner Glow layer style. Changing the values of Opacity, Choke and Size. I choose to set the Opacity at 75%, Choke at 100% and Size at 1px.
Change the Inner Glow color from the default to #FFFFFF
Stroke
Finally we will apply the Stroke. First changing the values of Size. I choose to set the Size at 1px. Changing the Position at Outside
Change the Stroke Color from the default to #E6C15E6
It should look something like this now
Step #3
Now Duplicate the layer with the Shape. NowGo to Edit -> Transform -> Perspective move one the top-right corner outside till you have a shape like below
Go to Edit -> Transform -> Scale and scale it down a bit so it looks like opened.
Step # 4
Now we’re going to add a piece of paper. Create a new layer and draw a rectangule like below
Now we will apply somesome layer styles
Gradient Effect
Styling the Shape double-click on the Shape thumbnail in the Layers Panel to open up the Layer Styles dialog box, we will apply a Vertical Gradient Effect for your Shape. Then click on the Color Gradient on the right of the Gradient option to open up the Color Gradient Editor.
Double-click on left-color-stop and enter the color value #EDEDED, then double-click on right-color-stop and enter the color value #FFFFFF.
Stroke
Next we will apply the Stroke. First changing the values of Size. I choose to set the Size at 1px. Changing the Position at Outside
Change the Stroke Color from the default to #DDDDDD
Now Go to Edit -> Transform -> Scale and rotate the paper.
It Should Look like this.
Now put the piece of Paper Under the Folder, and set the Opacity at 65%.
Now let’s “curve” the top corner of the paper. Delete a small part of the top corner.
Should look like this.
Now select the Pen Tool and draw the shape(the one in black)
Now we will apply some layer styles to the shape.
Styling the Shape double-click on the Shape thumbnail in the Layers Panel to open up the Layer Styles dialog box, we will apply a Vertical Gradient Effect for your Shape. Then click on the Color Gradient on the right of the Gradient option to open up the Color Gradient Editor.
Double-click on left-color-stop and enter the color value #EDEDED, then double-click on right-color-stop and enter the color value #FFFFFF.
Stroke
Next we will apply the Stroke. First changing the values of Size. I choose to set the Size at 1px. Changing the Position at Outside
Change the Stroke Color from the default to #DDDDDD
Final Result
This is what we gone do today
If you’d like to check your work, you may download the PSD file for this tutorial
if you would like to receive more Tutorials from us, please consider subscribing to our feed by RSS or by email.


Nice task…thanks
Pingback: uberVU - social comments
Really nice tutorial! thanks man
Semmy
Minisite Design
nice work pal…keep it up.
wow this is such a useful tutorial, thanks for sharing on your blog! I know good tutorials aren’t easy to come by these days, but following this was so easy and it’ll be useful on my website
Nice tutorial…
good job.keep it up.
Thank’s , i have created many folder icon with your tutorial and i have released it for webdesigner uses.
Nice tutorial…
ps: where i can find all your photoshop tutorial?