Hey guys one more Photoshop Tutorial. In this Tutorial i’ll find you How to Create a Simple Green Button in Photoshop. This is very simple and quite effective tutorial. I hope you will enjoy this tutorial.
Final Result
This is what we gone do today
Step #1
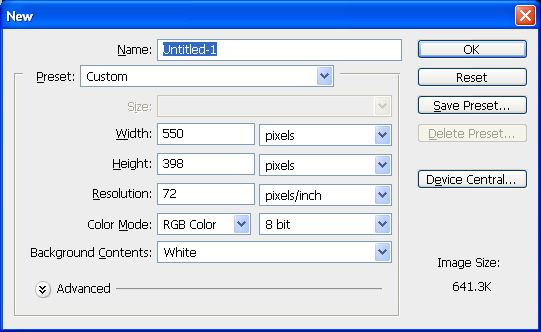
Open photoshop and create a new document, mine is 550px×398px with a white background.
Step#2
Fill the color in background layer, mine color is #979696.
Step #3
Select the Rounded Rectangle Tool and create button, mine Radius is 5px, width: 219px and height: 40px..
Now we will apply some effect
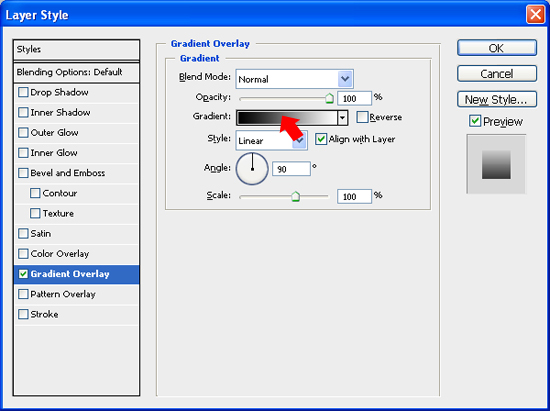
Gradient Overlay
Styling the Button double-click on the Button Layer’s thumbnail in the Layers Panel to open up the Layer Styles dialog box, we will apply a Vertical Gradient Effect for your Button. Then click on the Color Gradient on the right of the Gradient option to open up the Color Gradient Editor.
Double-click on left-color-stop and enter the color value #55A646, then double-click on right-color-stop and enter the color value #A5CE3F.
Drop Shadow
Next apply the Drop Shadow layer style. Keep the Angle at 120o, than changing the values of Opacity, Distance and Size. I choose to set the Opacity at 20%, Distance at 1px and Size at 5px.
Inner Shadow
Next apply the Inner Shadow layer style. Keep the Angle at 120o, than changing the values of Opacity, Choke and Size. I choose to set the Opacity at 27% and Choke at 100% and Size at 2px.
Next Change the Blending option to Normal.
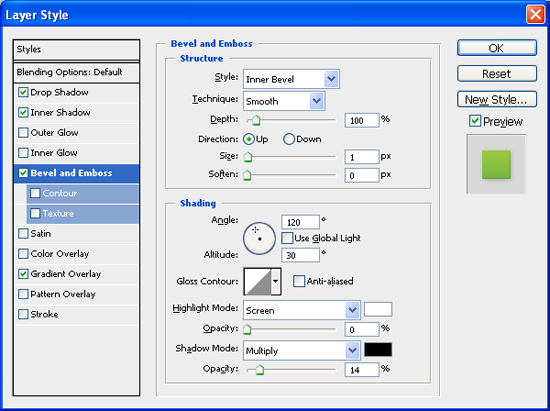
Bevel Emboss
Next we will apply Bevel Emboss, First Changing the Style to Inner Bevel and Technique to Smooth, than changing the values of Depth, Direction, Size and Soften. I choose to set the Depth at 100%, Direction at Up, Size at 1px and Soften at 0px
Keep the Angle at 120o, Altitude at 30o
Highlight mode :I choose to set the Opacity at 0%.
Shadow mode : I choose to set the Opacity at 14%.
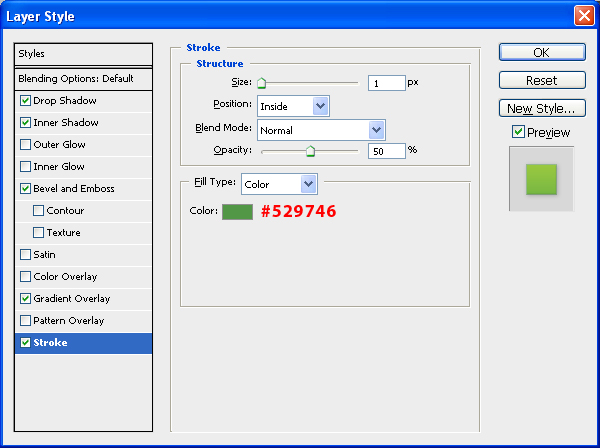
Stroke
Finally we will apply the Stroke. First changing the values of Size. I choose to set the Size at 1px. Changing the Position at Inside
I choose to set the Opacity at 50%.
Change the Stroke color from the default to #529846
Should Look like this.
Step #4
Select Horizontal Type Tool and type text on front.
We will apply some effect for text.
Gradient Overlay
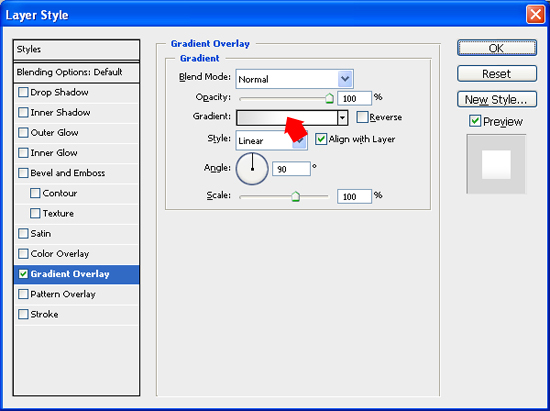
Double-click on the Text layer’s thumbnail in the Layers Panel to open up the Layer Styles dialog box. First we will apply Gradient Overlay, we will apply a Vertical Gradient Effect for your text. Then click on the Color Gradient on the right of the Gradient option to open up the Color Gradient Editor..
Double-click on left-color-stop and enter the color value #DDDCDC, then double-click on center-color-stop and enter the color value #FFFFFF.
Drop Shadow
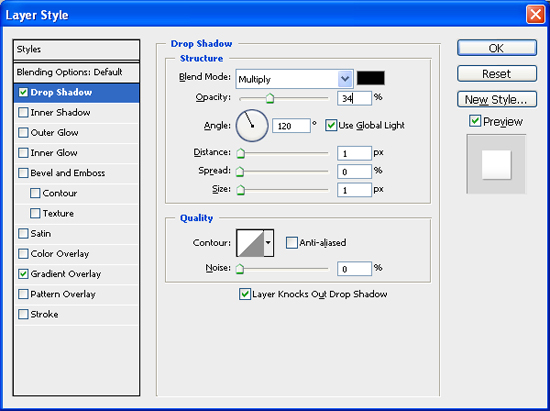
Finally we will apply the Drop Shadow layer style. Keep the Angle at 120o, than changing the values of Opacity, Distance and Size. I choose to set the Opacity at 34%, Distance at 1px and Size at 1px.
Final Result
If you’d like to check your work, you may download the PSD file for this tutorial
if you would like to receive more inspiration from us, please consider subscribing to our feed by RSS or by email.









great tutorial, thank you.
Simple but effective end result, thanks for the share.
.-= FAQPAL´s last blog ..HTTP Headers for Dummies =-.
great tutorial, thank you.
This article has been shared on favSHARE.net. Go and vote it!
.-= favSHARE´s last blog ..14 Top Typeface and Font Combinations Resources =-.
Would be a very helpful tip for beginners 😉
Is nice dud very good.