This is a beginning lavel design tutorial. In this article you will find how create nice 3d(three-dimensional) text effect in Photoshop. this is very quick and easy graphic design tutorial.I hope you will enjoy this tutorial.
Final Preview
This what we gone do Today
Step #1
Open photoshop and create a new document, mine is 550×498px with a white background.
Step #2
Fill the color in background layer, mine color is #333333.
Step #3
Select Horizontal Type Tool and type text on front. I am using “Arial” with Bold and size “90” to make sure I get the best detailing in to it.
Step #4
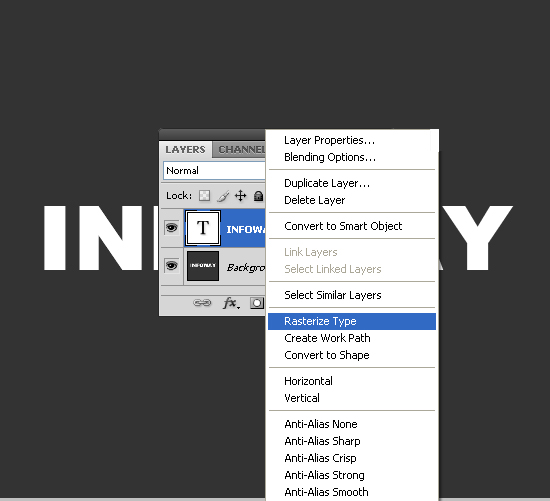
Right-click on the text layer and click on Rasterize Type (or Rasterize Layer depending on what Photoshop CS version you’re using).
Step #5
Let’s continue to transform our text into 3D. Select the INFOWAY layer. Than go to “Edit” -> “Transform” -> “Perspective”(CTRL+T)
Holding down Ctrl, click on the top right transform control of the box. Should look like this.
Step #6
We are going to start giving this text a 3D look. First, we want to duplicate our text layer; Now, while holding down CTRL+ALT, press the UP arrow, as you will notice, this duplicates the layer, and move it up by 1 pixel. now do this about 8 to 10 times, after that, you will get something like this:
Step #7
Now, what you need to do is marge ALL the “duplicated” layer together, EXCEPT the top one.
To do this, make sure you select the 2nd layer to the top and Merge it to ALL the layers underneath it together like so…(DO NOT Merge to the background layer)
Step #8
Now apply some effect
Now Go to Layers Palette, select the INFOWAY layer.
Color Overlay
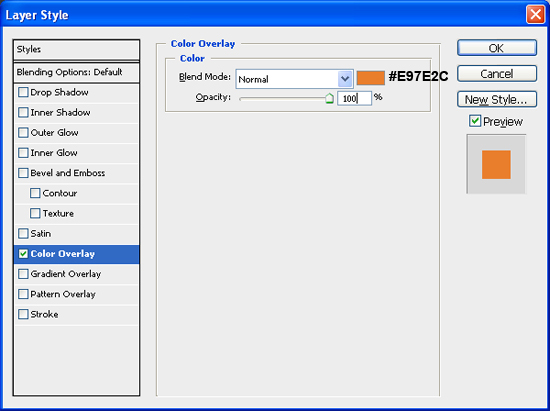
Styling the Text double-click on the INFOWAY Layer’s thumbnail in the Layers Panel to open up the Layer Styles dialog box, we will apply a Color Overlay effect for your Text. Then click on the color box, i choose #E97E2C.
Inner Shadow
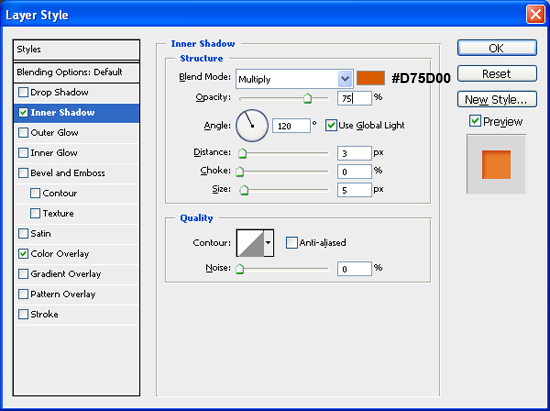
Next apply the Inner Shadow layer style. Keep the angle at 120o, than changing the values of opacity, Distance and Size. I choose to set the Opacity at 75%, Distance at 1px and Size at 5px.
Change the Inner Shadow color from the default to #D75D00
Inner Glow
Next apply the Inner Glow layer style. Keep the Blending mode at Screen, than changing the values of Opacity, Choke and Size. I choose to set the Opacity at 45%, Choke at 7% and Size at 90px.
Change the Inner Glow color from the default to #FFA800
Satin
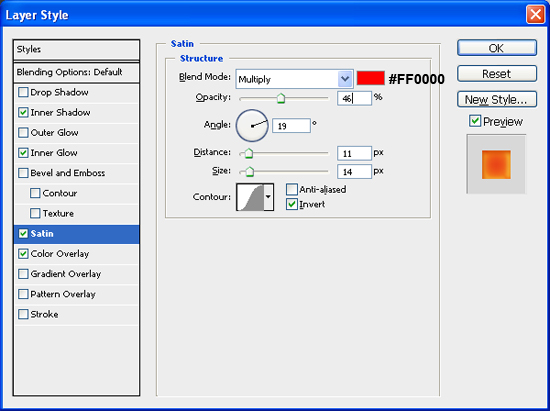
Next apply the Satin layer style. Keep the Blending mode at Multiply, than changing the values of Opacity, Distance and Size. I choose to set the Opacity at 46%, Distance at 11% and Size at 14px.
Important Part: Keep the angle at 19o
Change the Inner Glow color from the default to #FF0000
After that, you will get something like this:
Now we will apply all these layer styles (Layer » Layer Styles » … )to the Bottom layer:
Now apply some effect
Gradient Effect
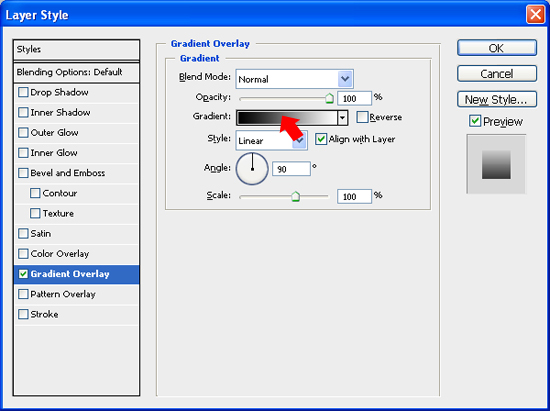
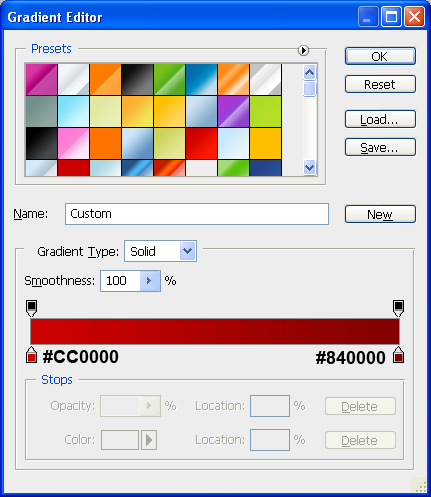
Styling the Bottom Layer double-click on the Bottom Layer’s thumbnail in the Layers Panel to open up the Layer Styles dialog box, we will apply horizontal gradient effect for your Bottom Layer. Then click on the color gradient on the right of the Gradient option to open up the Color Gradient Editor.
Double-click on left-color-stop and enter the color value #CC0000 then double-click on right-color-stop and enter the color value #840000.
Inner Shadow
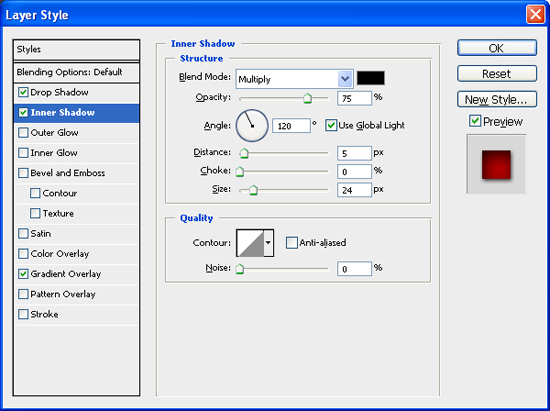
Next apply the Inner Shadow layer style. Keep the angle at 120o, than changing the values of opacity, Distance and Size. I choose to set the opacity at 75%, distance at 5px and Size at 24px.
Drop Shadow
Finally we will apply the drop shadow, Keep the angle at 120o, than changing the values of opacity, Distance and Size. I choose to set the opacity at 75%, distance at 2px and Size at 5px.
Result
When everything is setup you should now have something looking like this:
Download the source file
If you’d like to check your work, you may download the PSD file for this tutorial.
Download File : Nice Easy 3D Text Effect (72.5KB)











WoW 🙂 Very easy and well defined tutorial to learn. Thanks for sharing this awesome post. If you need any any graphics design help please click http://www.clippingimages.com
Nicely put together
Thanks i’ve bookmarked this
It was an easy to follow tut – well done
I just bookmark this tutorial…
Thanks..
Its really a awesome tutorial. I just Love it!!