Hey guys back-to-back Photoshop Tutorials. In this Tutorial i’ll learn you how to create I-Phone Like Button in Photoshop. This is very simple and quite effective tutorial. I hope you will enjoy this tutorial.
Final Preview
This is what we gone do today

Step #1
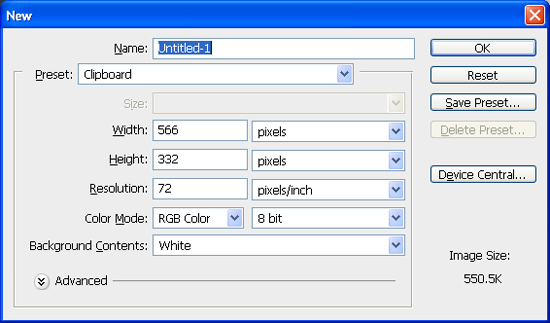
Open photoshop and create a new document, mine is 550×398px with a white background.
Step # 2
Fill the color in background layer, mine color is #333333.

Step # 3
Create a new layer name the layer Stripe gradient. Choose the Rectangular Marquee Tool and create white stripe.

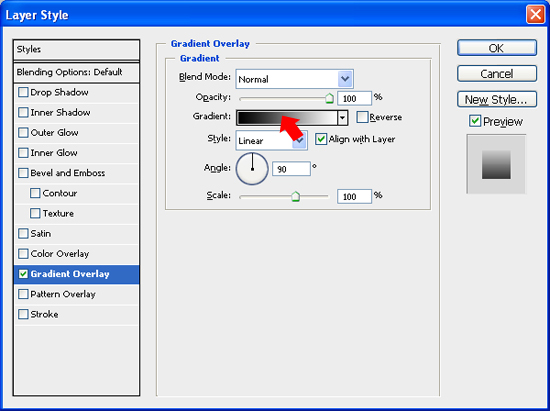
Styling the Stripe Layer double-click on the Stripe Layer’s thumbnail in the Layers Panel to open up the Layer Styles dialog box, we will apply a vertical gradiant effect for your background. Then click on the color gradient on the right of the Gradient option to open up the Color Gradient Editor.
Double-click on left-color-stop and enter the color value #aaaaaa, double-click on left-center-color-stop and enter the color value #cccccc, double-click on right-center-color-stop and enter the color value #dddddd, then double-click on right-color-stop and enter the color value #ffffff.
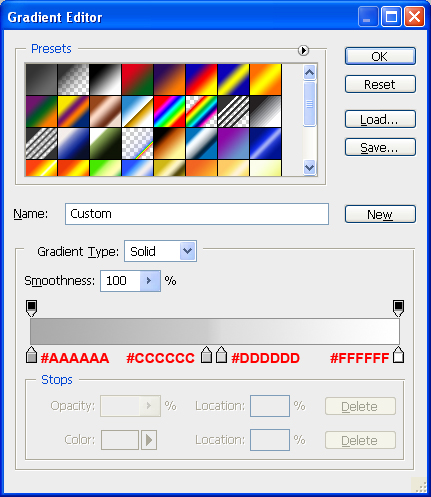
Should look like this.

Step #4
Select the Rounded Rectangle Tool and create button, mine radius is 90X40px.
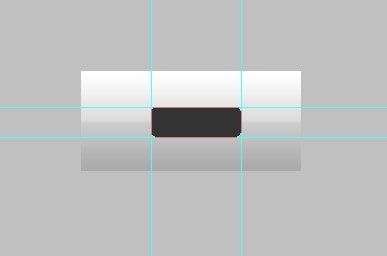
Now apply some effect
Gradient Overlay
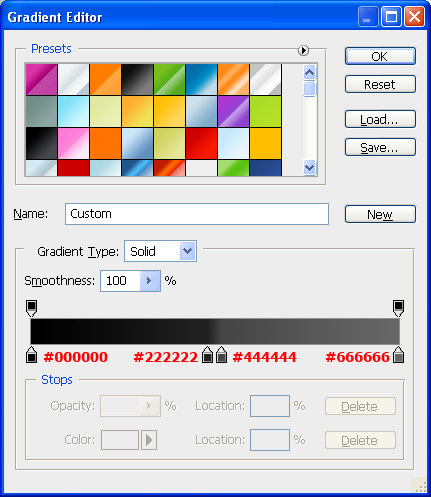
Styling the Button double-click on the Button Layer’s thumbnail in the Layers Panel to open up the Layer Styles dialog box, we will apply a vertical gradiant effect for your Button. Then click on the color gradient on the right of the Gradient option to open up the Color Gradient Editor.

Double-click on left-color-stop and enter the color value #000000, double-click on left-center-color-stop and enter the color value #222222, double-click on right-center-color-stop and enter the color value #444444, then double-click on right-color-stop and enter the color value #666666.
Bevel and Emboss
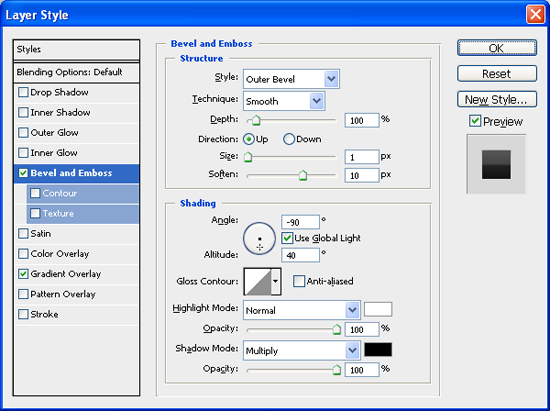
Next apply the Bevel and Emboss layer style. Changing the style to Outer Bevel , than changing the values of Depth, Size and Soften. I choose to set the Depth at 100%, Size at 1px and Soften at 10px
Important Part of this Tutorial : Keep the Angle at -90o, Altitude at 40o
Highlight mode :I choose to set the Opacity at 100%.
Shadow mode : I choose to set the Opacity at 100%.
Stroke
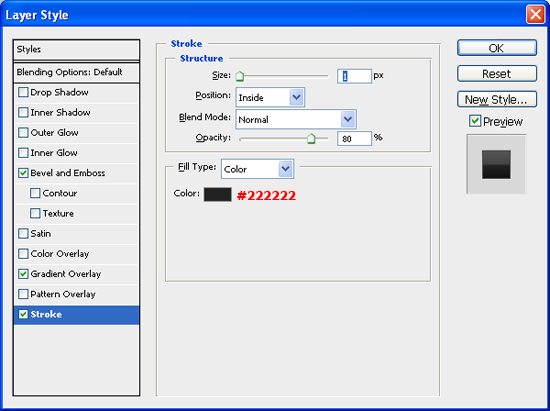
Finally we will apply the Stroke. First changing the values of Size. I choose to set the Size at 1px. Changing the position at Inside
I choose to set the Opacity at 80%.
Change the Stroke color from the default to #222222
Should look like this.

Step #5
Select text tool and type text on front.

We will apply some effect for text.
Bevel Emboss
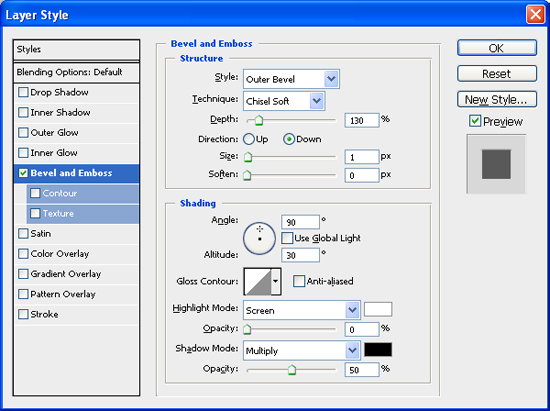
Double-click on the Text layer’s thumbnail in the Layers Panel to open up the Layer Styles dialog box. We will apply Bevel Emboss, First Changing the Style to Outer Bevel and Technique to Chisel Soft, than changing the values of Depth, Direction, Size and Soften. I choose to set the Depth at 130%, Direction at Down Size at 1px and Soften at 0px
Important Part of this Tutorial : Keep the Angle at 90o, Altitude at 30o
Highlight mode :I choose to set the Opacity at 0%.
Shadow mode : I choose to set the Opacity at 50%.
Final Preview
Finally we have done this tutorial.
This is what we gone do today

Download the source file
If you’d like to check your work, you may download the PSD file for this tutorial.
iphone-like-buttons.rar (21.3 kb)

nice one! i like it 🙂
Thanks for this, but could you make a tutorial for making the itunes buttons? 🙂 Thanks.
Awesome tutorial 🙂 I tried it in both CS3 and CS4, and it worked like a charm 🙂 Thanks for sharing.
Thanks!
I have always like the button interface used by the iPhone. Will definitely bookmark the page for future reference. By the way, do you happen to know how to create those Mac buttons?
Great demo. Can you share where you downloaded some of the Presets shown above in your screenshots? Are they defaults from Photoshop CS5? Thank you.
Pingback: iPhone Like Black Buttons psd file Button Psd Files | Buttons | Download Free PSD